7. Using an IDE in CC Linux application development
In many cases it is much easier to use a graphical development environment to develop and debug code. This section will provide two different use cases. First, using VS Code and then finally using qt-creator to build and deploy graphical applications on to the target.
The guide assumes that the setup of your system is the same as required for building the BSP. That is, a modern Linux distribution with the necessary tools available.
Download (or build) the SDK for your platform and install it into a preferred location. For this example, the target platform is V1200/V1000. This guide will assume that the location of the SDK is:
/opt/cclinux-v1x00-2.0.5.0
Clone/create your application and launch VS Code from the directory. For this example, we will use the example application described in 6.1.1.
Optional: Install C/C++ extension for IntelliSense for proper code parsing.
Open C/C++ configurations by pressing shift-ctrl-p and selecting C/C++ Edit configurations (JSON) and add the following:
Note, that the includepath and defines will vary based on what is accessible and configured. In the example above the main things to note are:
includepath: Point this to all the include-files you are using. The example above also has the qt-libraries installed.
defines: Use this for IntelliSense parsing, such as working with the CCApi where you have multiple platforms defined, but only want to see the one you are working on.
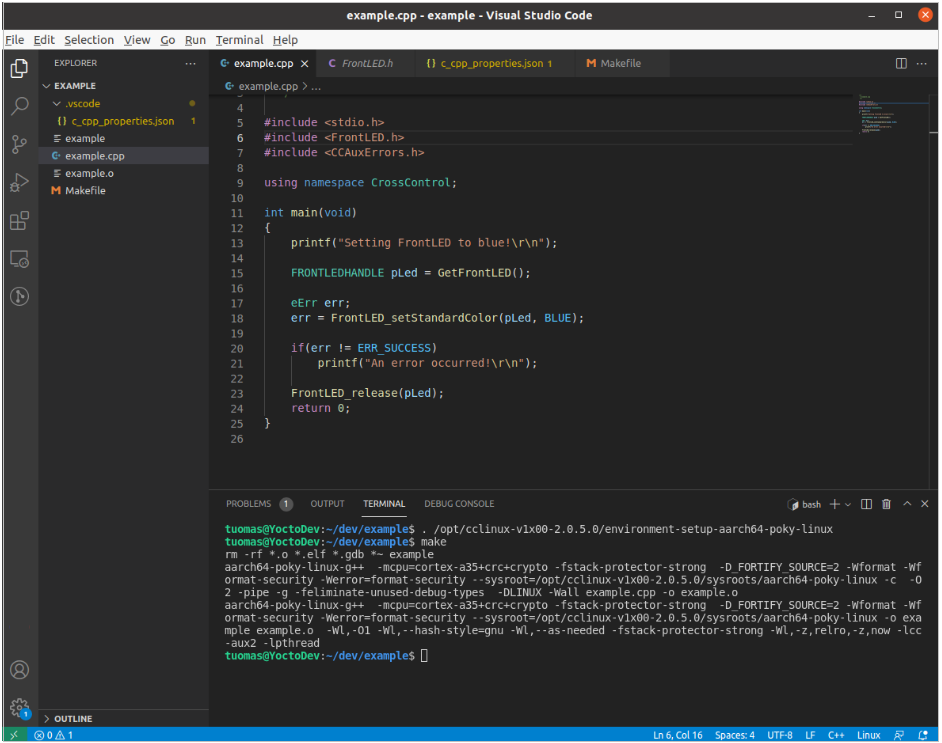
This should now enable you to edit (with autocomplete on headers) and compile the application in VS Code:
NOTE: Remember to source the cross-compilation environment in the terminal before compiling!
VS Code can also be set up to remotely debug the target application. To do this:
Add new file under .vscode called launch.json
Copy the following configuration to launch.json (again noting the paths as appropriate for your specific platform). Also note, the IP-address and port of the target device and replace as necessary.
{
    // Use IntelliSense to learn about possible attributes.
    // Hover to view descriptions of existing attributes.
    // For more information, visit: https://go.microsoft.com/fwlink/?linkid=830387
    "version": "0.2.0",
    "configurations": [
        {
            "name": "(gdb) Launch",
            "type": "cppdbg",
            "request": "launch",
            "program": "${workspaceFolder}",
            "args": [],
            "stopAtEntry": false,
            "miDebuggerServerAddress": "10.131.48.53:3000",
            "cwd": "${workspaceFolder}",
            "environment": [],
            "externalConsole": false,
            "MIMode": "gdb",
            "miDebuggerPath": "/opt/cclinux-v1x00-2.0.5.0/sysroots/x86_64-cclinuxsdk-linux/usr/bin/aarch64-poky-linux/aarch64-poky-linux-gdb",
            "miDebuggerArgs": "",
            "setupCommands": [
                {
                    "description": "Enable pretty-printing for gdb",
                    "text": "-enable-pretty-printing",
                    "ignoreFailures": true
                }
            ]
        }
    ]
}
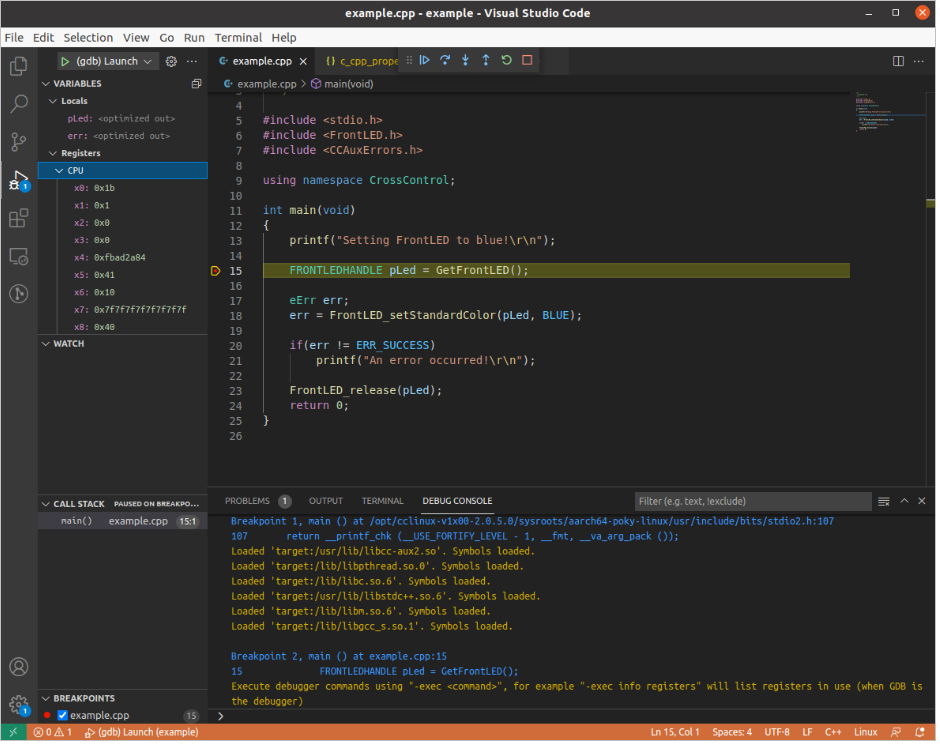
Deploy the target application to the device and launch it on the target noting the selected port in the debugger configuration:
tuomas@YoctoDev:~/dev/example$ sftp ccs@10.131.48.53
sftp> put example
Uploading example to /home/ccs/example
example                                                                     100%   18KB   2.8MB/s   00:00
sftp> exit

tuomas@YoctoDev:~/dev/example$ ssh ccs@10.131.48.53
ccs@10.131.48.53's password:
Welcome to ccpilot-v1x00-release-2.0.5.0-44-ga9fd1d47-virt (brant)
Built from: ccpilot-v1x00-release-2.0.5.0-44-ga9fd1d47-virt
on: 20211217
Built by: root@yoctobuild.ad.centromotion.com
ccs@v1200:~$ gdbserver localhost:3000 /home/ccs/example
This method also works when editing applications withing the Yocto system with devtool. The only difference is that deployment can be automated with devtool-deploy.
Finally, set any wanted breakpoints, and launch the debugging in vscode from Run -> Start debugging or simply pressing F5. This will attach gdb to the application and pause on the selected breakpoint.
In addition to vscode, qtcreator can be used to create and debug qt-applications on the target.
It is assumed that the SDK has been installed, with a specific version of qt installed in the the SDK as defined in Qt application development
The assumed location for the SDK is:
/opt/cclinux-v1x00-2.0.5.0
Install qt-creator for your preferred distribution.
Launch qt-creator and open Options.
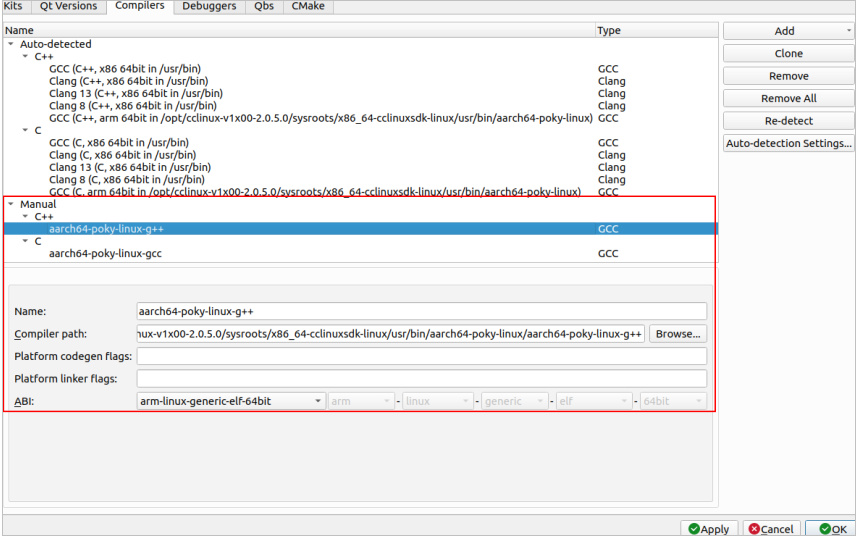
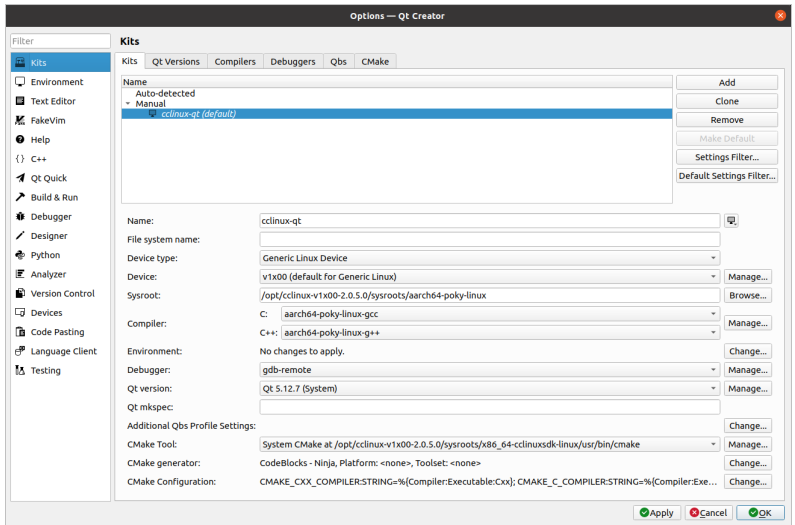
Qt may, or may not automatically find the cross-compilers, but it is safer to manually add and name both C and C++ compilers:
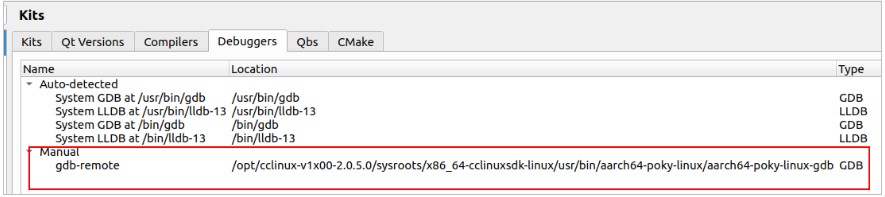
Next, add the debugger path and binary:
Then, configure the Qt version by telling qtcreator the location of qmake:
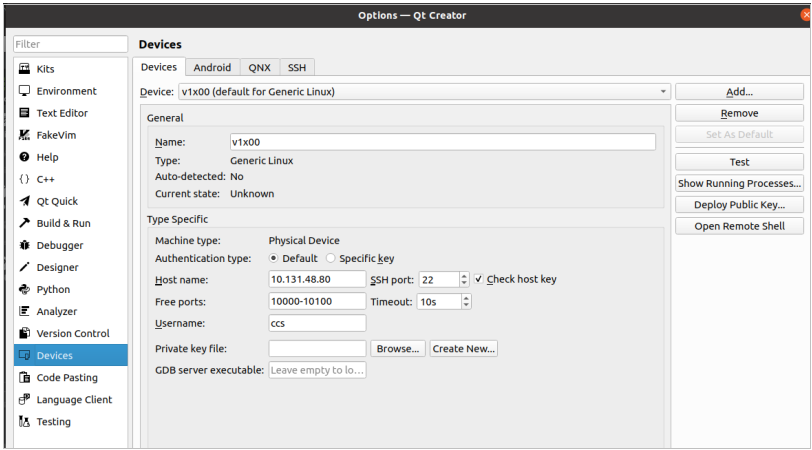
Before adding the Kits, you can add the target device for easy deployment and integration. Got to devices and select add with the following options noting the hostname and target device name:
Finally, add the kit with the specific options pointing to the correct cross-compilers and device:
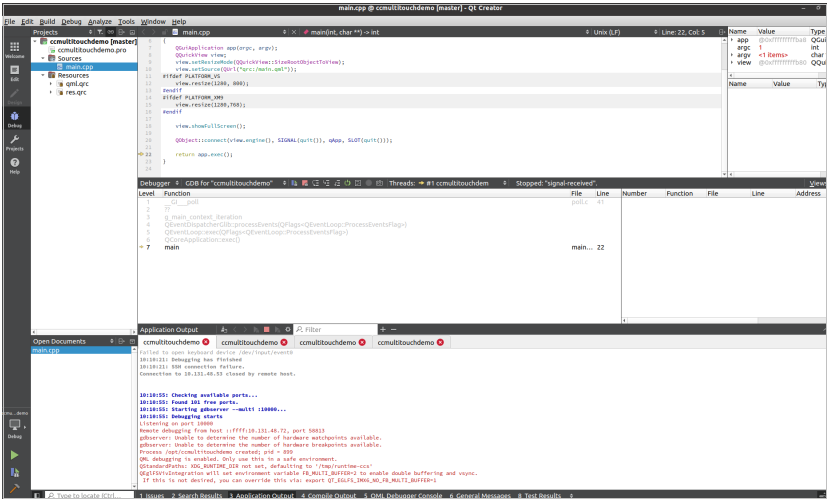
After this you should be able to automatically build, deploy run and debug the application on the target device directly with qt-creator. Example, debugging a CrossControl demo application on the target device: