Getting Started with Qt
A desktop installation of Qt-6.5.3 from the Qt Company is installed in the Virtual Machine. Before starting to build applications a pre-compiled Qt runtime for the target CCpilot display needs to be installed as well as a Software Development Kit with cross-compiler and needed dependency files.
Setup build environment
The current version of the LinX Software Suite does not contain any SDK packages for our devices. This is to save space and streamline the build environment for the customer needs. To update the LinX Software Suite to add the SDKs for these devices please check our Setup SDK and build-tools section.
UX Designer version 5.1 comes with support for build using Docker containers as an initial tech-preview. This introduces an easy and flexible way to install dependencies and tools for desired target CCpilot displays. To get started using Docker, head over to the Getting Started using Docker section.
CrossControl also provides template applications for our display devices, and it is recommended to use these templates when targeting a CCpilot device. The template projects are set up for required dependencies and include paths for the different targets.
New project
One of above setup procedures are required prior any target build as described below.
To begin a new project for the CCpilot V1200, open Qt Creator and select
[File->New Project...]
Choose the CC Application (Qt) Project and select the CC Qt Quick 6 Application for the new application as shown below, and click Choose….
In the Project Location section change the name of the project and set the project location to your preferred directory. Then click Next >.
In Define Build System setting you can choose between cmake and qmake. Please note that if you are using Docker build only cmake build-system works.
In Define Project Details you can select desired (installed) Qt runtime version.
In Translation File you can setup language translation files if wanted.
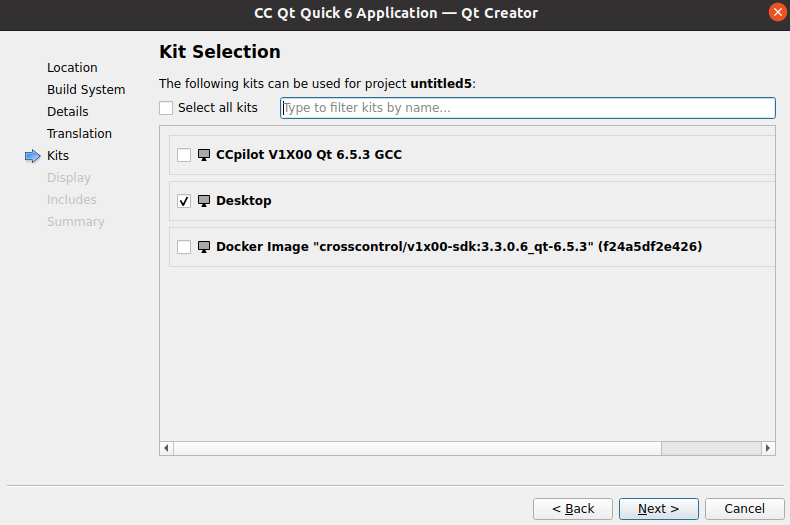
Before creating the Qt project, users can specify which Kits (SDKs) they want to use in the project. The kit includes the setup for the Qt runtimes, there is one kit for each CCpilot display computer installed. Several kits can be selected if you want to target several display types. Kits can easily be added later as well.
It is recommended to include the Desktop kit, for running the application in the Virtual Machine. Since this example project is using the V1200 we can also add CCpilot V1X00 Qt 6.5.3 GCC kit or Docker Image Click Next > to proceed.

In the Display Settings window, you need to choose a resolution that matches the device. In this example it is a V1200 display which has the screen resolution of 1280x800.
Orientation should be set to Landscape. Screen resolution of the CCpilot displays:
• CCpilot X1200:    1280x800
• CCpilot V1200:    1280x800
• CCpilot V1000:    1280x800
• CCpilot VS:       1280x800
• CCpilot X900:     1280x768
• CCpilot V710:     800x480
• CCpilot V705:     800x480
• CCpilot V510:     800x480
• CCpilot VI/VI2:   320x240
Next section Includes gives the possibillity to add include settings for the CrossControl CCAux and/or Sapcore/Data Engine APIs.
The last page of the setup wizard is for project management. Git comes pre-installed in the virtual machine and is useful for version control of the application. Press Finish to complete the wizard.
CrossControl Template project file
The CrossControl template project creates a .pro file with pre-configured search paths for each target device. For cmake projects a CMakeLists.txt is created with necessary settings.
If you are converting a preexisting Qt project, please look at the template file in VM5 to see how to configure the project file to work with the new runtimes/virtual machine.
As depicted in the picture below, there are several blocks of code, one for each build kit. Add additional include paths and/or dependencies in the correct block as required.
Qt Designer
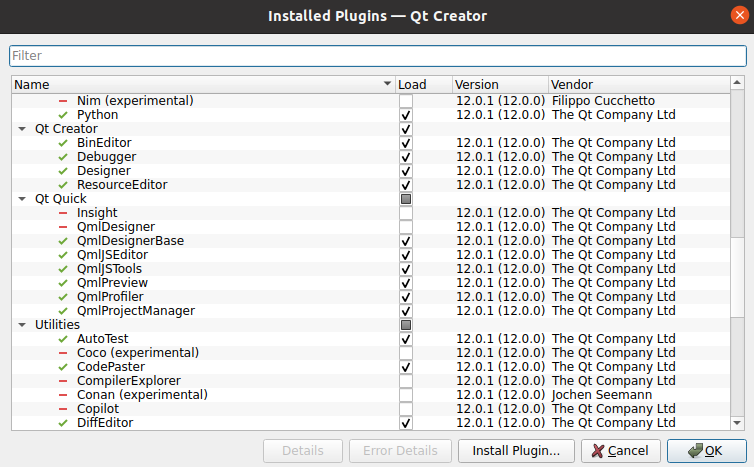
Please note that Qt QML Designer (visual qml editor) is default diabled in this version. To enable, follow below instructions.
Open the Qt Creator plugin manager and select in the menu,
[Help->About Plugins..]

Scroll down and check the box at Qt Quick->QmlDesigner

Setup a target device
To start developing an application with UX Designer version 5.1, it is recommended to connect the development machine and the CCpilot device on the same network and use Ethernet to deploy and remote debug.
More information of how to add Remote Linux Device can be found in the Deploy to target section under chapter Setup deploy application to target
In the Debug tab on the left side of the window, you can choose the Kit you want to run the project on, since this example uses the Desktop and CCpilot V1X00 kits, we can select either of these.
Running the application with the Desktop kit will show the application in it’s native resolution which we created, 1280x800.
By selecting the CCpilot V1X00 kit developers can run the application on the CCpilot V1000/V1200 after connecting the display on the network.